How to Assemble the TWSBI ECO
Today we’re going to demonstrate how to disassemble and reassemble your TWSBI ECO fountain pen.
First things first though – you actually do not need to disassemble your TWSBI ECO before using it. In fact, if you keep your pen in good condition, you might go several months before you feel the need to take it apart.
The video above shows you how easy it can be to disassemble and reassemble your TWSBI ECO. We’ve also added the individual steps below, but recommend referring to both the first few times you take it apart and put it back together.
The only tool you need for this is the TWSBI wrench (either the red plastic one or the silver metal one). This tool is crucial for taking apart the pen components!
Disassembly:
- The first thing you want to do is uncap your TWSBI. This is because if it’s capped, it can actually keep the piston rod from staying in one place.
- Twist the piston knob so the piston is all the way down (fully extended) to make room for the wrench. You will see two flat areas just below where the piston knob meets the top of the barrel where the wrench goes.
- Now - and this is key- the wrench needs to be rotated clockwise. This is Lefty-Tighty, Righty- Loosy. It feels very weird because it’s not how we normally unthread things, but it's how you do it with TWSBI.
- Once it’s fully unthreaded, grab the housing and pull gently.
- The piston rod will come out, and the gasket can come off the rod if you need to remove it for a super deep cleaning.
- Continue unthreading the knob from the housing shroud, and set aside.
- Pull out the inner shroud, also set aside. You should have 5 separate parts now, if you removed the gasket from the piston rod.
- Now you can do whatever you need to do. When you're ready to put it back together, you just reverse everything!
Reassembly:
- Pop the gasket on the piston again if you removed it.
- Reinsert the inner shroud into the main threaded unit.
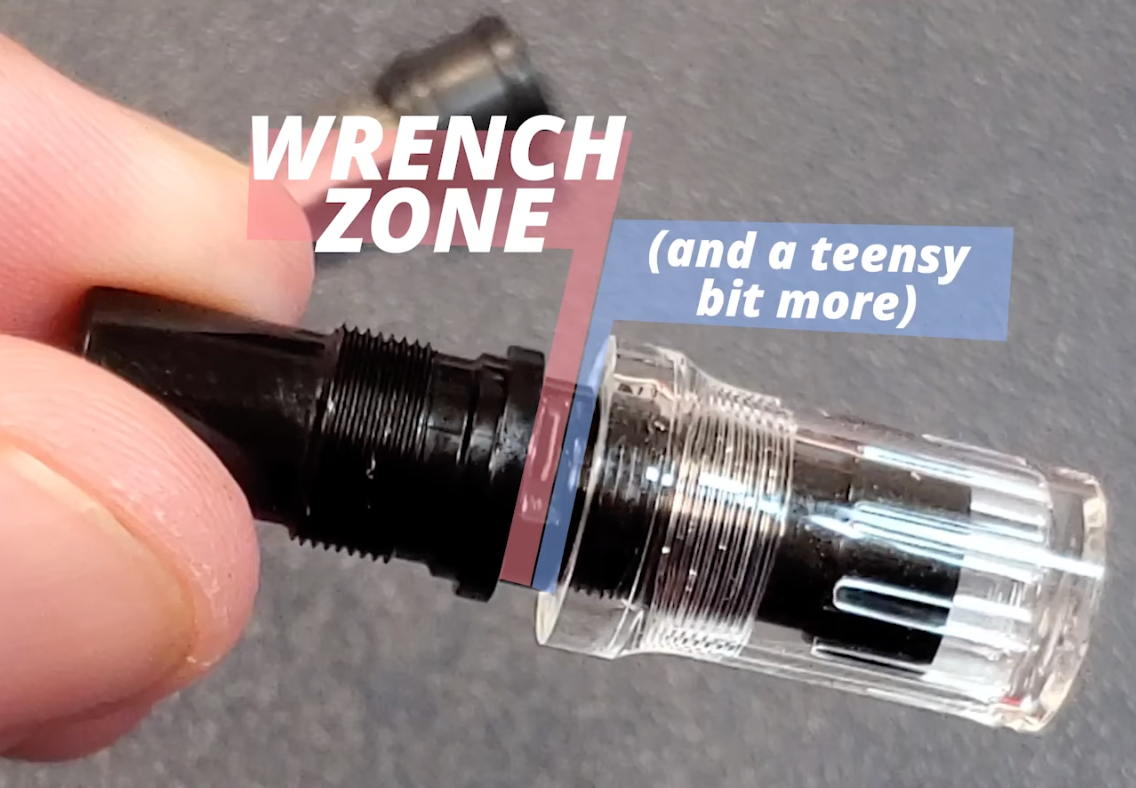
- Screw back on the knob. This is one of the trickiest parts- Screw up to the wrench zone, and a tiny bit more - Maybe as much as 1mm but even that might be too much space. You might have to play around with this step a few times to get it in the right position.

- Then insert the rod again into the inner shroud.
- Hold the piston rod with your forefinger, grab the main unit, and thread to bring the piston into the main unit.
- Leave a little space between the main unit and the gasket from the top of the piston unit.
- Unthread it enough to get your wrench in to put back on the barrel.
- You can use the silicone grease on the gasket to keep the inside of the barrel well lubricated if you want, but it’s not always necessary.
- Insert the piston rod into the barrel of the pen. Use the wrench, and spin it counterclockwise to get the main threaded unit fully threaded into the barrel.
- Congratulations, you're done!
One thing to keep in mind, taking apart and reassembling your TWSBI ECO might take a few tries to get it right. That’s totally ok. It can even test your patience the first time, but once you get it, you will feel like you can conquer anything!
To keep your TWSBI Eco fountain pen in excellent condition, remember to clean it regularly and follow maintenance tips. This will help extend the pen's lifespan and maintain its writing quality.


